Thursday, November 28, 2013

Repainting the 4Runner Fiberglass Shell: The $50 Paint Job Way

This is less of an instructional, and more of a "ehhh, it looks better than it did."

Using the $50 Paint Job as a rough guideline, I set out to make my 4Runner's fiberglass shell look better than this. Duct tape stains, chips, faded factory paint, she had it all.

Fiberglass shell before
2 Coats primed, with 300 grit inbetween
I opted to move the shell into the garage to protect from weather, and to reach the center of the roof better.

Start by sanding shell with 150 grit to knock down blatant imperfections. Wipe with damp (water) cloth, then hit with 300 grit. Wipe with mineral spirits and let dry.

Take a can of Rust-oleum filler primer and apply your first coat. 
Smooth as silk after primer and sanding


I sanded with 300 grit between primer coats, and lightly used 600 grit after my final primer coat. I applied 4 or 5 primer coats total to help fill in the trail scratches and chips. The primer will be very dusty, and I highly recommend a breathing mask. Ideally, remove dust from sanding with compressed air.
First coat of Rust-oleum Black Satin Enamel


For paint, I used Rust-oleum Satin Enamel in the can, with foam rollers, and foam brushes. The brushes are almost pointless, but get one or two for getting around the drip-guides of the fiberglass shell.

I cut my enamel 50/50 with mineral spirits. This is thicker than $50 Dollar Paint Job, but I found with thicker paint, I got less roller marks. 
Two coats paint, then wet sand


After two coats, I began sanding with wet sand paper. I used 600 grit, soaked 15-minutes in water, then sanded with a spray bottle of water to keep everything well-lubricated.

In the Texas heat, I was able to apply about 3 coats per day. Typically 2 coats will be the daily maximum.

Four coats paint, getting ready for 1000-1500 grit wet sand


I cleaned my paint with mineral spirits after sanding. Reading back, this is apparently unadvised, as it can eat the paint. I personally didn't notice a problem.

After 2 coats I used 600 grit, after 4 coats I used 1000, 5th coat I used 1500, 6th coat I used 2000 grit. I had the grand plan of polishing with compound, but it honestly looked good the way it was.
Six coats paint and 2000 grit wet sanded.


In retrospect, the satin finish was probably the best finish I could have picked. Flat eventually absorbs moisture, and gloss would have been very hard to work with and smooth out. I would 100% recommend satin for this model of 4Runner shell.


Then apply liberally with grit and mud 
On the plus side, the satin finish cleans up great with a pressure washer


Good info from the pros:

Wednesday, November 27, 2013

Cutting Toyota Fenders Without Welding

 This was preformed on a 1987 4Runner with extensive body damage. 
If you have a clean 4Runner, please consider more professional options first.

When I bought my 4Runner, it had already been laid down, beat out, and rust patched with fiberglass, expanding foam, and kitchen drawer slides. No joke. Not only was it ugly, but it also got in the way of the 4Runner's great articulation. For many reasons, that all needed to come out.

Rear fenders before modifications


Masking tape and Sharpie. I decided to cut an inch higher than pictured here.

A great way to start trimming fenders, is to lay out some masking tape on the fenders and use a Sharpie to draw where you want your cut. I made a very large cut because I wanted to remove all the rust and fiberglass. It is popular however to make a less pronounced cut, and to follow the factory body lines.


Following the Sharpie line, make your cut


Once you have decided where you want your fender lines, you're ready to cut. For the rear fenders, it is advisable to use a grinder with a cut-off wheel. I used a Sawzall with a new steel 4" blade however. If you decide to use a Sawzall too, make sure to angle the blade to avoid hitting the rear seatbelts and speakers, and tape all wires out of the way.


What you see here is the factory wheel tub hanging out much lower than our new fender line. This is usually where a welder comes in handy, but not for us. Details to follow.

Optional step
Great for mild weather, or if you don't mind "weather" in your fenders

This step is optional. I ran around with my fenders like this for a month while I decided how I wanted to patch the wheel tub. 

Take the Sawzall and make 4-6" cuts perpendicular to the fender in the wheel tub. Take a shop hammer and large channel lock pliers and bend/hammer the wheel tub strips up into the fender.  


Wheel tub pushed up into the fender and out of the way


This optional step will look close to this when you're finished. Minimize hitting the actual fender, and just aim the hammer at the wheel tub strips. The channel lock pliers will help in getting the "reverse bend" in the strips gracefully started.


Wheel tub removed to pinch weld
and steel bar supports riveted 


When you're ready to continue with the wheel well, remove the tire, and use the Sawzall to remove the wheel tub within 1-2" from the pinch weld. Masking tape won't stick here, but the pinch weld is visible enough from inside the wheel well.

For this next part, you'll need some steel rivets, a steel rivet gun (not aluminum), some steel bar from Home Depot/Lowes, and one of the 5' industrial carpet mats for $20 they carry in the flooring section.

Cut the steel bar into strips and bend the ends with a vice and large pliers. I ended up using my leaf springs and body weight to bend the steel after awhile. I don't advise this if you have nice leafs. Bend the steel so that it matches the curve of the fender. Drill holes into the fender for your rivets, then line the bar up, mark it with a Sharpie or drill, then remove and fully drill a hole through the steel bar. Rivet bar into place in fender. Rinse and repeat around the entire wheel well, making sure to place steel bar at corners and top of wheel well for support.


Steel bars installed and painted black


This is what the steel bars will look like when you're finished. It began raining before I could install the tub, so I sprayed them black to help protect against rust.


Creating a pattern. Area is roughly 1.5'x5'


Before you cut your rubber floor mat, create a pattern and factor in any tucks, folds, etc. you'll need in the material. Remember, measure twice, cut once.

Once you have a pattern you're happy with, lay it on the floor mat and cut the floor mat so that the carpet faces inside the fender, and the rubber backing faces outside, towards the tire. 


Flip your pattern so that rubber faces outside


If you reuse your pattern for the other wheel well, remember to flip it so that the carpet will still face the inside of the fender, and the rubber to the outside.


Bolting the fender rubber into place


Now you're ready to install the rubber into the wheel well.

I used 1/2" bolts with washers for strain relief on the rubber. Drill bolt holes one at a time into the steel strips and existing wheel well, and poke the bolts through the rubber using a small phillips-head screwdriver. Adjust rubber as needed after each bolt is installed to ensure the rubber lays flat.

Perimeter bolts installed, and rubber sliced to tuck into fender


Rubber tucked into fender, and black adhesive installed
After the bolts are installed, slice the rubber so that you can tuck it up into the fender. Use a fresh razor knife for best cuts, and go slow so you don't slice too far or too much.


Once you have your rubber tucked into the fender, take some black adhesive and caulk into and around the seams of where the rubber meets the fender. Smooth adhesive and re-apply once set up if you need to build up an area. 


Inside view of fender


While caulking with adhesive, access the inside of your fender from the bed of the 4Runner and push the extra rubber material against the inside of the fender. You should have ample adhesive here, and it will cause the rubber to adhere to the fender. This forms more support and a better seal between the rubber and fender.

If you push any adhesive out the fender, smooth it out with your finger while it's still wet.

Let adhesive fully set before painting


Repainting rear fenders to match lines of front fenders.
Dust bolts and seams with rattlecan bedliner to texture and blend
35" tires don't touch these fender tubs at all.


Tuesday, November 26, 2013

GM Alternator Upgrade: How to install a CS-144 on a Toyota 22RE

This GM alternator upgrade was preformed on a 1987 4Runner with the 22RE. 
For other popular Toyota alternator upgrade info, please see notes below.

The factory alternator on my 1987 4Runner 22RE was rated at putting out 60-70amps. Not only was this woefully under-powered for the 4Runner's build, but this alternator had seen one too many mud holes and had decided to kick the bucket. I decided to upgrade to the CS-144, which is rated at 140amps, and is more appropriate for my power needs.

Side note: if your "Brake" and "Charge" lights come on at the same time, it's an indication of an alternator issue. You can have your alternator checked, while installed in the vehicle, at most auto part stores.

To begin the CS-144 alternator upgrade, you will need a few parts.
  • CS-144 Alternator
    • I went with the 1995 Cadillac Fleetwood alternator from O'Reilly's Auto Parts. When choosing your CS-144 for your 22RE, you want one with an internal regulator. The 1st generation of 4Runners had internal regulators, which makes wiring very simple. Details below.
  • TrailGear GM-to-Toyota relocation bracket
    • The CS-144 alternator is massive, and the factory bracket will not fit it. Some people try to get by with stacking washers on the bracket. This will not work with the CS-144. You need the extended adjustment bracket (top piece).
  • V-belt pulley
    • The CS-144 is only offered with a serpentine belt pulley. The v-belt pulley you need is a Delco 24-1100-1. Most auto repair shops can easily swap these pulleys for you. I used an alternator-specific shop for both my pulley purchase and install. It cost me $7 and 10-minutes of my time. Completely worth it.
  • Extended V-belt
    • You need a belt 1.5" longer than your factory belt. The belt I used was a MasterPro 7360, a 10mm-930mm belt.
  • 3-wire GM connector
    • O'Reilly's part number BWD PT200
  • 78" 4-gauge wire. A battery cable works great here
    • The factory alternator-to-battery cable is way too small for this upgrade.
  • 4-gauge crimp-on eyelets
    • Found near the battery cables at the parts store. I found mine at Auto Zone, 
  • 150amp circuit breaker or inline fuse
    • A high-quality in-line fuse of this size can be expensive. I opted for the circuit breaker design so I can reset it if it blows. I also found this at Auto Zone, part number BP-CB185-150.
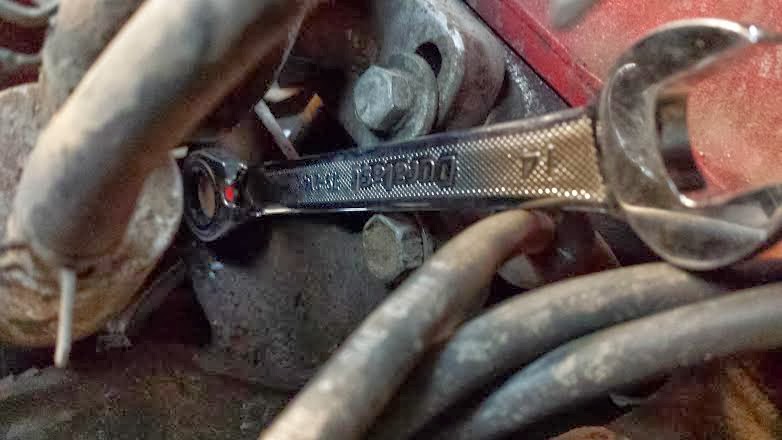
  • 10mm, 12mm, and 14mm ratcheting box-end wrenches
    • Because they will preserve whatever sanity you have left.
Side Note: You will be removing your entire external cooling system during this upgrade. New hoses and radiator would be a very easy repair at this point. New AC and power steering belts are recommended as well. 

Now that you have your parts, you're ready to dive in and upgrade your alternator.

Factory alternator
vs.
 1995 Cadilliac Fleetwod CS-144
To begin removing your factory alternator, unhook the negative battery terminal. Drain and remove lower radiator hose. Unplug the factory plug from the alternator, and unbolt/remove the bottom swivel alternator bolt and ground eyelet. Then unbolt/remove the adjustment bolt at the top of the alternator.

Your alternator, with some maneuvering, will drop out the bottom of the engine bay.
Now the fun begins.

Removing coolant system


To install the over-sized CS-144, you with need to create yourself some room. To do this, I removed my air intake hose, electric fan and my radiator. One screw at each end of the factory air intake, 4 corner bolts on the electric fan, and 4 corner bolts on the radiator, and the assemblies pulled out through the top of the engine bay.


Upper factory Alt. bracket bolt


To remove your factory alternator bracket, there will be 2 bolts on the top bracket, and 4 bolts on the lower bracket. The top bracket will have one bolt on the front of the engine block, between the power-steering belt tensioner and the power-steering pulley. The second bolt is near the dipstick tube, and partially behind the power-steering pump bracket. The surest way to reach this second bolt is to unbolt the power-steering bracket. 
Hard-to-reach P.S. bracket bolt. 


If you have large hands, you will likely need to remove the distributor to reach this power-steering bracket bolt. Removing it is okay, but you need tiny hands to re-install it. 

Once your 2 bolts have been removed, wiggle the bracket out of place and sell it on eBay. You won't need it where we're going.
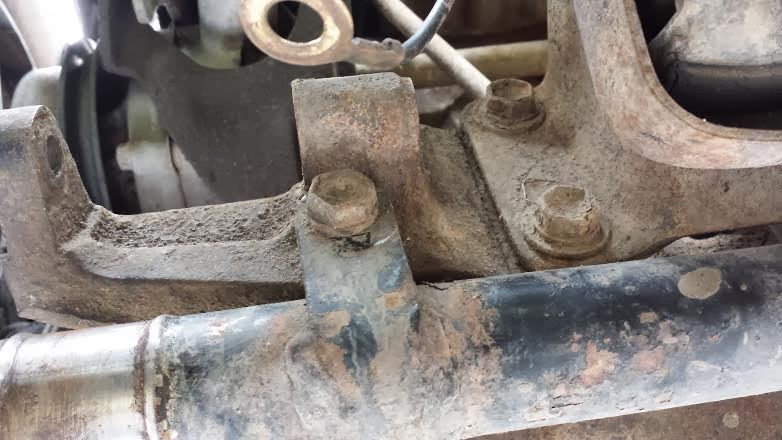
Lower Alt. bracket bolts (4)


The lower alternator bracket has 4 bolts. Use a 2" drive extension and a breaker bar for the 2 engine mount bolts.


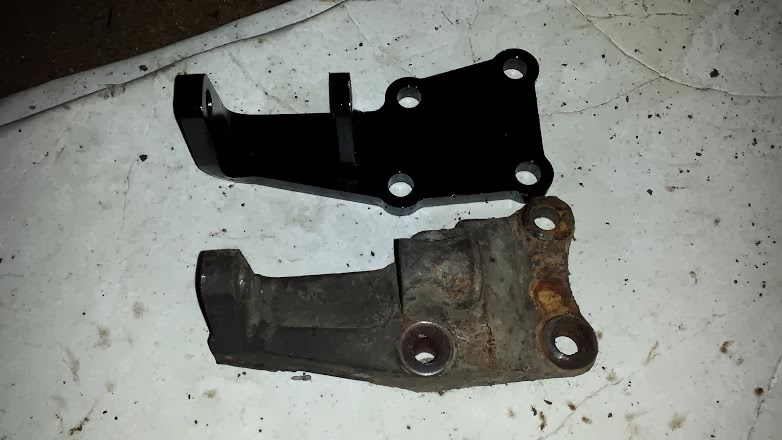
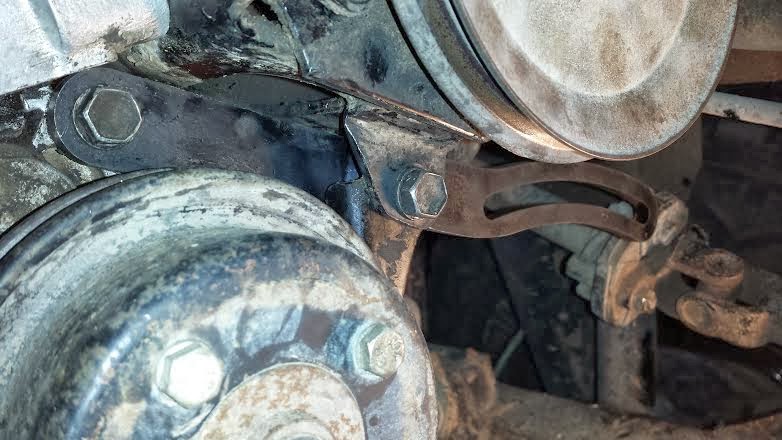
TrailGear relocation bracket
vs.
Factory alternator bracket


When installing the new bracket, I installed the top-right bolt first, then love-tapped the bracket into place and installed the second engine mount bolt.

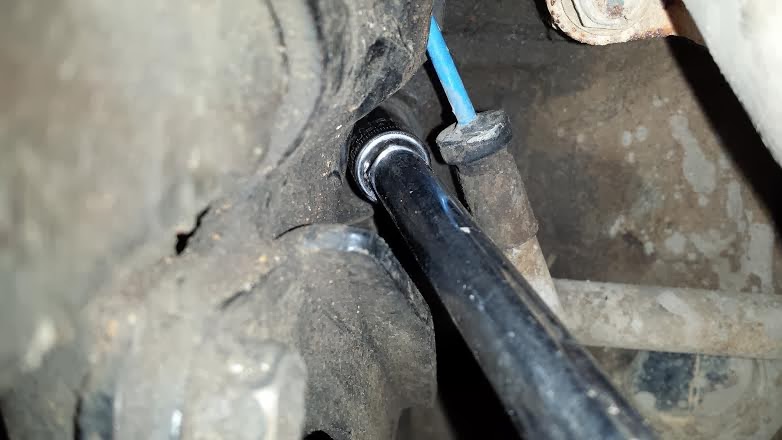
Now that your lower bracket is installed, install the CS-144 alternator and connect the ground cable to the swivel bolt.
TrailGear relocation upper bracket


After your CS-144 is bolted into place on the bottom, you can install the upper bracket. The upper bracket installs behind the power-steering pulley bolt (right), and bolts onto the block (left). My CS-144 isn't in the picture because I tried installing the whole bracket before installing the CS-144. This does not work because the CS-144 hits the upper bracket during installation and will not go into place.
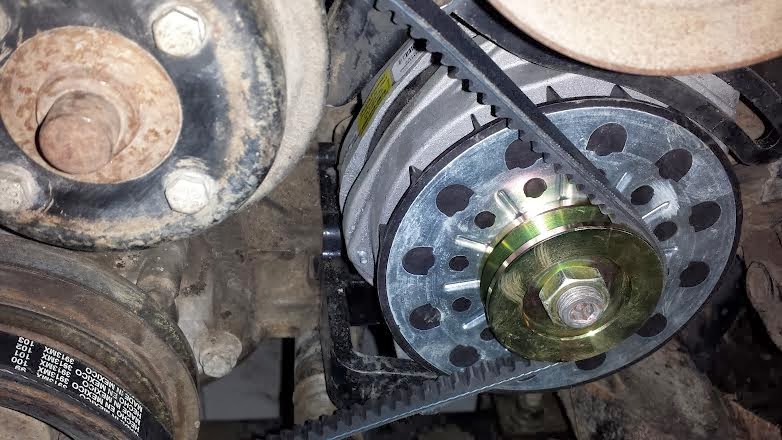
New alt. belt


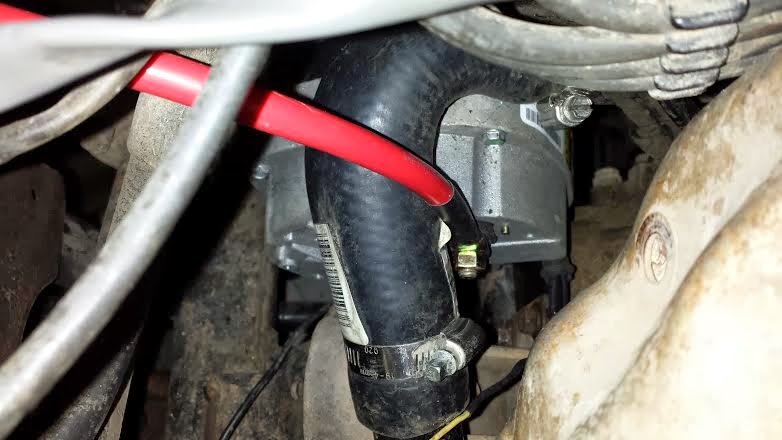
Now that your bracket is fully installed, you can install your new 1.5" longer belt and adjust the tension.

To move the CS-144 enough to install and tighten the belt, you will need to remove the radiator hose above the alternator. You can then slip the belt on and adjust like normal. 
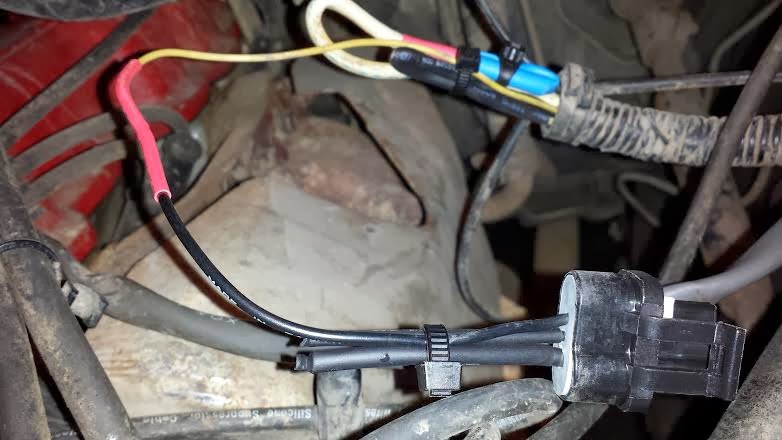
Factory wiring to GM plug


Before you re-install the radiator hose, use that extra space to wire and install your GM plug. The plug comes in 3- and 4-wire options. Get the 3-wire.

Take your factory alternator harness, and cut off the factory alternator plug. Take your factory yellow wire ("L" or "Alt light") and connect it to the "L" on the GM plug.  
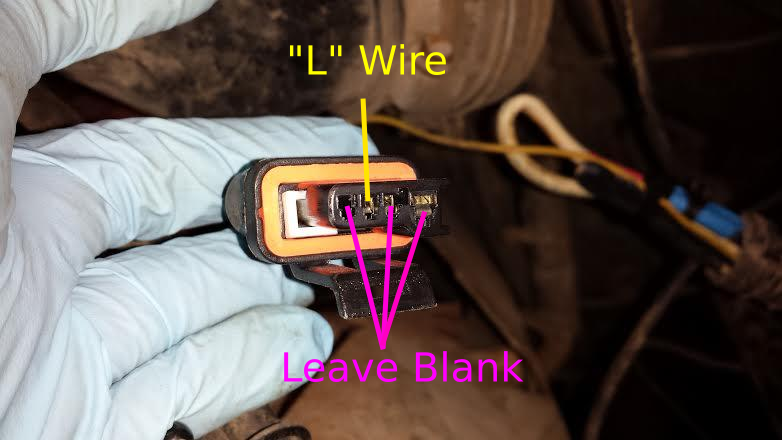
GM 3-wire plug


The CS-144 should have a "P L I S" labeled on the alternator side of the plug, but in case yours doesn't, the GM "L" is the 2nd from the empty port. 

You inadvertently just did the "one-wire mod."
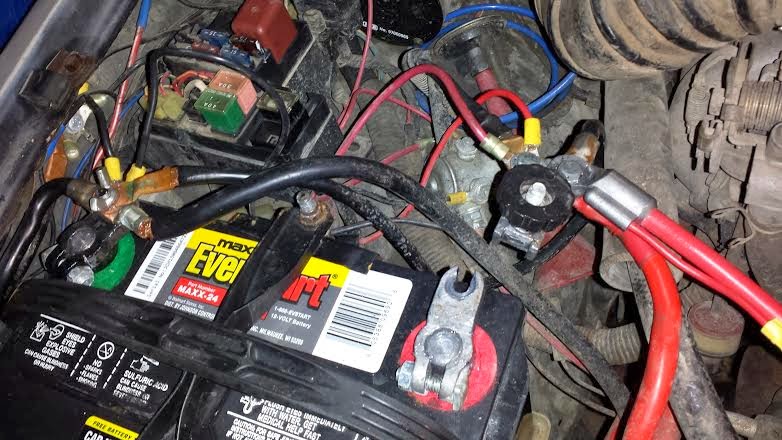
4-gauge hot with heat shrink at eyelet.


Take your 78" 4-gauge and heat shrink over the extra exposed copper on the eyelet end. Coat eyelet with dielectric grease and install on CS-144. Then re-install the radiator hose.

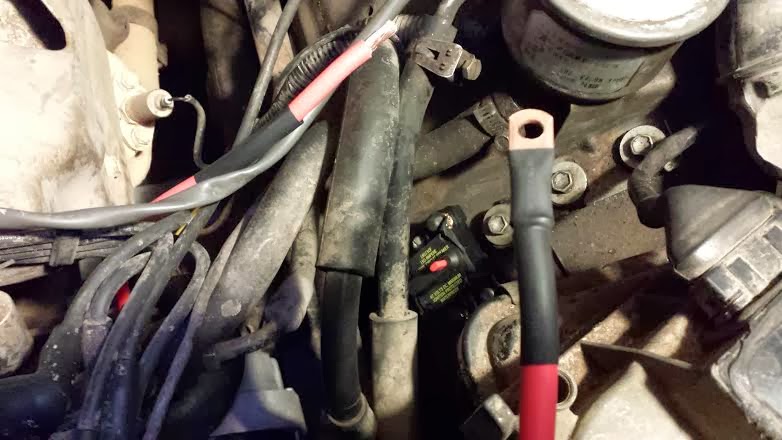
4-gauge, copper crimp-on connectors, and 150amp breaker


At this point, run your 4-gauge to see where it'll fit best. I ran mine under the air box and over the radiator. Once you have your wire where you want it, you can see where you want to install your 150amp inline fuse/breaker.

Cut the 4-gauge (measure twice, cut once!) and install the crimp-on connectors. Heat-shrink over the extra copper and install with dielectric grease on to the inline fuse/breaker.

After your inline fuse/breaker is fully installed, tie the 4-gauge into your battery.

Side note: Keep an eye open for my future post, "Power Distribution Boxes: Tame the Main"


You are now ready to re-install your radiator, fan, and air intake. 
You are finished installing your CS-144 alternator on your Toyota 22RE!

You will notice that you have some very small clearances between your steering and your CS-144. These have not caused a problem in my install, tensioning of the belt, or driving, but please keep an eye on your own install and make sure the steering is not contacting your CS-144.

Other Toyota-to-GM alternator upgrades